Search This Blog

Translate

Blog Archive

Uplifting Word

OH, give thanks to the LORD, for He is good! For His mercy endures forever.
Psalm 107:1
Showing posts with label by Kelly Taylor. Show all posts

Jun 20, 2023

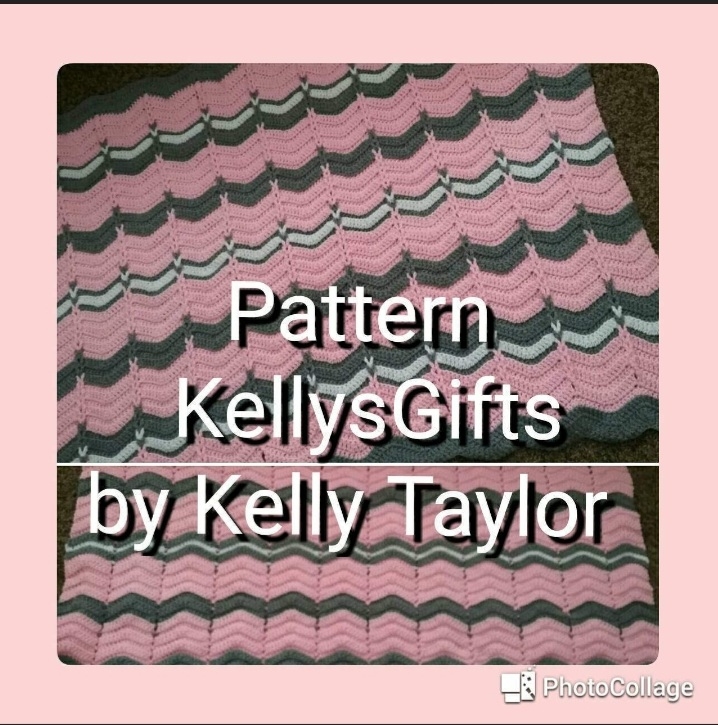
Cable Loop Chevron Crochet Blanket Pattern


I started making a Chevron blanket as I was working I became bored. 
So, I decided to change things up a little by adding some texture. 
Here is the result!


This Chevron made new. 
Cable Loop Chevron Crochet blanket pattern can be 
worked in any color and any size you wish.
The blanket works up quickly and easily.  

Here is a picture of the finished blanket.
As you can see in the first picture the Chevron Loops go in the opposite diction
 to what you are use to.

To get a printable pattern please use the print button.


https://www.etsy.com/listing/502273648/pattern-crochet-cable-loop-chevron
https://www.etsy.com/listing/502273648/pattern-crochet-baby-blanket-cable-loop

Sep 29, 2017

Poncho Crochet pattern

I like to crochet different things. Don't you get tired of the same thing. So, this time I'm on a roll of crocheting ponchos for my granddaughters.

Here are pictures of the two a made with hats. They're so cute right!

They're easy to make just start with a even number of chains. Make sure that it will fit over the head. You can make it as long as you wish or the length of their arms.

I used the granny square stitch. Started with a chain foundation with a single crochet in each stitch. In next round I worked 3 dc skip 2 spaces and for the the points ( 3 dc, ch 2, 3 dc). Make sure you have a even amount of stitches on each side.

Trim in anyway you wish and add a flower.

As for the hat it is a simple beanie pattern with a flower.


Mar 7, 2017

Crochet Pattern Heart Hat LOVE

Valentine Heart 
Crochet Hat Pattern


This hat was made for the little sweetie. What a great add to a hat for the little one that you love.

I started out with a easy hat that I made for Christmas and the hearts for Valentines day! 
I just love to make thing as a free form style!

I wrote the pattern out for you so you can make one of your own.
This is a easy pattern hope you like it!


Designed by Kelly L Taylor


                                           For a friendly print out of the pattern click Here.
                                         
                                     The first two pictures is what the finished hat looks like.


Top view of the hat.


View of the heart.


View of the work of the heart and how to add the hearts onto the hat.


Pattern click Here.


Size:  12 months about 18” around
              To 2 years 19” around
                                                 
Materials list:

Crochet Hook size I

Yarn worsted medium #4, Red Heart super saver, 100% acrylic,

Color Red (A) and White (B)

NOTE: Any yarn will work for this pattern; remember it will need to be a worsted weight yarn #4.


For a friendly print out of the pattern click Here.

Directions:

Start of Brim


Working with (A) white

Row 1: Ch 6, skip 2 chs, sc in the third ch from hook. Work in back loops. Ch 1, turn. (6 sts count chs).

Row 2: Fpsc in each space arcoss. Ch 1, turn.  (st count 6). *Repeat until you get

 the length needed sl st to form a ring, ch 1, sc in same sp, sc on top around ring (59 rows counting chs). *Don’t finish off or cut*.


Body of Hat

Round 1-3: Change color to red. Ch1, hdc in each st. sl st in ch.

A decrease is working 2 sts together.

Round 4: Decrease round. Hdc in the first sp. Hdc together next 2 sts, hdc in next 12 sps. (4 decreases) Use markers to mark the decreases.

Round 5: Decrease at each marker. Start with an hdc in first st. Decrease at markers and sl st at end of round ch 1.

Round 6-11: Repeat round 5.

Round 12: Decrease every 2 sts.


Round 13: Decrease every 1 sts. Weave through ea st to close the hole for the top of the hat. (Opening shout). 


Hearts

Using red, size I hook.
Round 1: Use a magic ring loop. Working in the ring Ch 2, work 3 trdc, 3 dc, ch 1, 1 trdc, ch 1, 3 dc, 3 trdc, ch 2, sl st in ring, pull ring tight.

Round 2: Sc in next 2 sts, 2 sc in the next 3 sts, sc in the next 5 sts, ch 1. Sc in the next 4 sts, 2 sc in the next 3 sts. 1 sc in the next sts. Sl st, finish off.


Round 3: Using white to trim the heart. Sl st in center of heart. Sc in next 2 sps, 2 sc in the next st. Sc in the next 9 sps, ch 1. Sc in next 10 sps, 2 sc in the next sp. 1 sc in the net 2 sps, sl st in next sp. Ch 8, sl st to top of hat, ch 8.

Don’t cut. You will add next Heart to the end of chain. Make next heart and add it to the end of the chain by repeating the Trim. Finish off.


Designed by Kelly L. Taylor  

Content Copyright, © 2017,  By Kelly L. Taylor.  All rights reserved.
This content was written by Kelly Taylor. If you wish to use this content other than for personal use of making garment for your use only, not for selling or copy in any manner, you need written permission.


Feb 16, 2017

Crochet Pentagon Sweater Pattern

Kelly's Gifts on Etsy

by Kelly Taylor

You can wear this Sweater two ways!


For a friendly print out of the pattern click Here.


Materials:

Hook size: J
Color: 1- 6 oz. Cherry Red, 4- 6 oz. Pewter (Gray) 
Yarn: Red Heart with Love, yarn #4


Abbreviations Crochet Terms

Ch = chain
Dc = double crochet
Dec = decrease
Ea = each        
Hdc = half double crochet
Bpdc= back post double crochet
Fpdc = front post double crochet
Sc = single crochet
Sl st = slip stitch
Sts = stitches
Sp = space
Rd or R = Round or Row 


For a friendly print out of the pattern click Here.


DIRECTIONS: 


Chain 2 counts as dc.

Color changes:  Rounds 1-11 are Gray, 12-18 Red, & 19-30 Gray.

RD 1: Ch 3, sl st to first ch to form a ring, ch 2, counts as a st. Working in a ring, make 2 dc, ch 1, *(Make 3 dc, ch 1)*. Repeat 3 times. Sl st to top of ch 2. (Stitch count, 5- ch 1 spaces.)


RD 2:  Working in the ch 1 sp, ch 2, 1 dc. *Dc in each of the next sp until the ch 1 sp.

In ch 1 sp work 2 dc, ch 1, 2 dc. * Repeat. Sl st in top of ch 2 sp. (Stitch count 30).


For a friendly print out of the pattern click Here.

RD 3: Repeat RD 2. (Stitch count 45).

RD 4: Repeat RD 2. (Stitch count 60).

RD 5: Repeat RD 2 for RDS 5-14.


Stitch count:

RD 5: 75
RD 6: 90
  RD 7: 105
  RD 8: 120
   RD 9: 135 


 Photo of Sleeve


For a friendly print out of the pattern click Here.


                                                                    DIRECTIONS:  
                                                                                                   

Stitch count
RD 10: 150
RD 11: 165
                       RD 12: 180 color change.
RD 13: 195
RD 14: 210


NOTE:

Will be adding arm holes.

Measure your back from arm to arm to make sure the arm holes will be in the right location.
If the Pentagon is not big enough do more rounds. If it's to big then take out some rounds.
Measure your arms you will need the arm holes bigger then your arms.

How to increase arm holes.

Make as many chains to the size needed and
Add equal number of chains to spaces skipped.


RD 15: Ch 2, 1 dc in same sp. Ch 21, Sk 21 sps.  Dc in the next 21 sps.  Dc in each sp after with a (2 dc, ch 1, 2 dc) in the ch 1 sp. In next 2 sps work dc in each sp with a (2 dc, ch 1, 2 dc) in the corners. Next side work 22 dc across that’s one dc in each sp. Ch 21, work in the corner. (2 dc, ch 1, 2 dc). Dc in each sp across, 2 dc in the ch 1 sp. Ch 1, sl st in top of ch 2. Stitch count 230 with the ch.

Rd 16-18: Repeat RD 2. Working corners with (2 dc, ch 1, 2dc) dc in e asp. Sl st to top of ch 2. (stitch count 245)

Rd 19-30: Color change Repeat RD 2. Until you get desired fit. Finish off.


Sleeves: Sl st under arm, ch 2, dc in sp around, sl st to top of ch 2. Repeat until you get the length you wish. Finish off.


Trim: Last RD ch 2, sk st, dc in next st., dc in skipped st. Do three Rounds of trim.


For a friendly print out of the pattern click Here.

 Designed by Kelly L. Taylor  

Content Copyright, © 2016,  By Kelly L. Taylor.  All rights reserved.
This content was written by Kelly Taylor. If you wish to use this content other than for personal use of making garment for your use only, not for selling or copy in any manner, you need written permission.


Dec 28, 2016

TEAM HAT! Striped Christmas Hat Crochet Pattern


Copyright 2016. Not for sale or copying of any kind. Design by Kelly Taylor of KellysGifts


Striped Christmas Elf or TEAM hat you can make this in any color that you wish.
Just made this hat for my daughter. She need a hat for work because they told your that they needed to dress up for Christmas, she loved it!
This hat would be great for School or Team Hat for those games that you go to of your favorite team or just hanging out with friend's.


You can see full detailed pattern Here.


Materials Needed:
2 Skeins of worsted weight yarn
Crochet hook size I
Yarn markers
Cardboard

Starting with the brim of the hat. You will need to measure around your head to see would size brim you will need to make. One pictured is 20" around.
Use marker to mark your sl st sps, doesn't court of a stitch.

Brim

With White or any color you wish.
Ch 8, start in the second ch from hook work sc and sc in each ch across. ch1, turn.

Fpsc around each st across to end. ch 1, turn. repeat until you get the size needed. Sl st ends together to form a ring, this is you brim. Don't cut or finish. Ch 1, this is the start of the body of the hat. 

Copyright 2016. Not for sale or copying of any kind. Design by Kelly Taylor of KellysGifts

Body of hat

Work evenly across the brim with sc until you get the ch 1. Sl st in the ch sp. 

Row 1: Ch 1, Work a hdc in each sp around. Ch 1.
Row 2 & 3: Repeat row 1. 


Copyright 2016. Not for sale or copying of any kind. Design by Kelly Taylor of KellysGifts

Change color to Red or any color you wish. From here on you will be working 3 rows of each color.

Round 4 & 5: Repeat Round 1. 

Round 6: Decease round. hdc in first sp,*dec in next 2 sps. Hdc in next 4 sps. * Repeat. Sl st, Ch 1.  Note decrease is every 5th sp.

Change color
Round 7: Decrease every 4 sps. Sl st, ch 1.
Round 8: Decrease every 3 sps. Sl st, ch 1.
Round 9: Hdc in ea sp around. Sl st, ch 1.

Change color
Round 10-12: Repeat Round 9.

Change color
Round 13: Repeat Round 8.
Round 14: Decrease every 2 sps. Sl st, ch 1.
Round 15: Hdc in ea sp. S; st, ch 1.

Change color
Round 16-18: Repeat Round 15.

Change color
Round 19: Repeat Round 15.
Round 20: Decrease every 2 sps.
Round 21: Repeat Round 15.

Change color
Round 22-23 Repeat Round 15.
Round 24: Repeat Round 20.


Copyright 2016. Not for sale or copying of any kind. Design by Kelly Taylor of KellysGifts

Change color
Round 25-26: Repeat Round 15.
Round 27: Repeat Round 20.

Change color
Round 28-30: Repeat Round 15.

Change color
Round 31-33: repeat Round 15.

Change color
Round 34-36: Repeat Round 15.

Change color
Round 37-38: Repeat Round 15.
Round 39: Repeat Round 20.
Round 40-42: Repeat Round 15.


Copyright 2016. Not for sale or copying of any kind. Design by Kelly Taylor of KellysGifts


Change color
Round 43-45: Repeat 15.

Change color
Round 46-48: Repeat 15.

Change color
Round 49-51: Repeat 15.

Change color
Round 52-53: Repeat 15.
Leave long to tie off and to tie on pompom. 
Pompom use a 4" piece on cardboard to make the pompom. Tie the pompom to the end of hat. finish off.


Copyright 2016. Not for sale or copying of any kind. Design by Kelly Taylor of KellysGifts


Feb 24, 2016

Crochet Scrubbies/Facial Pattern

Crochet, Knit, Sewed items
and Patterns.

www.KellysGifts.etsy.com


Crochet Scrubbies / Facial Patterns

by Kelly L. Taylor


You will need:
Crochet cotton for dish cloths only color, crochet hook size F


 Ch = Chain
Dc = double crochet
Dec = decrease
Hdc = half double crochet
Sc = single crochet
Sp = space
Sl = slip stitch
St = stitch
Tr = treble 


Materials:


Cotton yarn- colors – Red & Cream. Size F crochet hook.
Working with cream color


Round 1- ch 4, sl st to first sh to make a ring. Ch 2, work 11 hdc in ring sl st at top of ch 2.

Round 2- Ch 2, in sand sp hdc, work 2 hdc in e asp, around, sl st to top of ch ch2. 

(Change here for the circle in center) * If you like to change color, here for circle look, you can keep going with same color.

Round 3 – Ch 2, in same sp work hdc, work hdc, work hdc in next sp, *2 hdc in next sp, hdc in next sp, * Repeat 6 time* total of 7, stop. *You are only going 3rd the way. Turn.

Round 4 – Ch 2, hdc in each space back to ch 2. Finish off only if changing color, if not go to Round 5.

*Trim with red.

Round 5 – If using same color ch1, sc in each sp around. Finish off. If using different color so st, ch1, sc in e asp around and finish off.


www.KellysGifts.etsy.com
Designed by Kelly L. Taylor  
Content Copyright, © 2012,  By Kelly L.Taylor.  All rights reserved.
This content was written by Kelly Taylor. If you wish to use this content other than for personal use of making garment for your use only, not for selling or copy in any manner, you need written permission.