Search This Blog

Translate

Blog Archive

Uplifting Word

OH, give thanks to the LORD, for He is good! For His mercy endures forever.
Psalm 107:1
Showing posts with label crochet. Show all posts

Jun 20, 2023

Cable Loop Chevron Crochet Blanket Pattern


I started making a Chevron blanket as I was working I became bored. 
So, I decided to change things up a little by adding some texture. 
Here is the result!


This Chevron made new. 
Cable Loop Chevron Crochet blanket pattern can be 
worked in any color and any size you wish.
The blanket works up quickly and easily.  

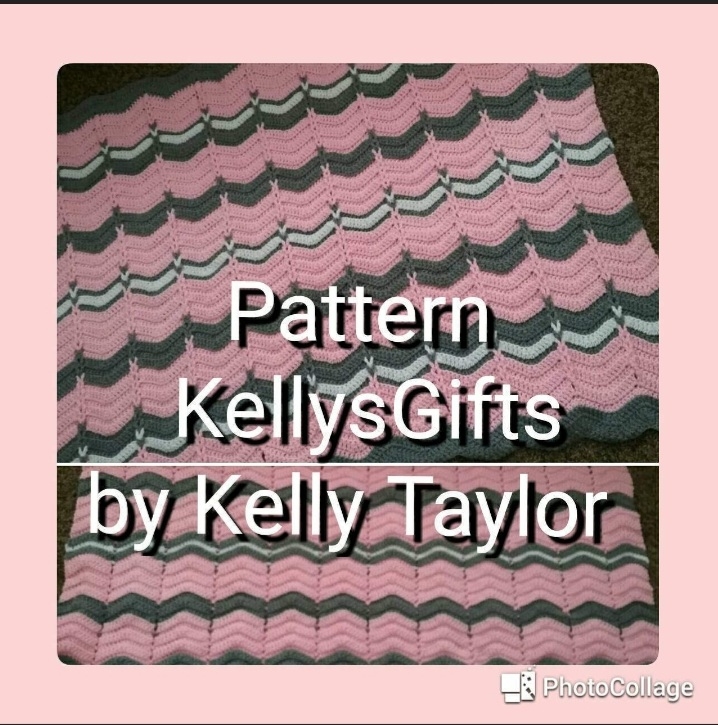
Here is a picture of the finished blanket.
As you can see in the first picture the Chevron Loops go in the opposite diction
 to what you are use to.

To get a printable pattern please use the print button.


https://www.etsy.com/listing/502273648/pattern-crochet-cable-loop-chevron
https://www.etsy.com/listing/502273648/pattern-crochet-baby-blanket-cable-loop

Mar 7, 2017

Beaded Baby Sandals Booties with Crochet Thread Part 3


Beaded Baby Sandals Booties with Crochet Thread Part 3


Center the chains for the first row.
You will be working dc back across for the strap after you slst to the sole.


Pattern

https://www.etsy.com/listing/266141759/0-12-months-2-pattern-beaded-christening


First photo is ch 13 for the first strap. Second photo is how to sl st the strap to the sole.

Link for pattern of the Beaded Baby Booties 

For anyone who wants to get a pair of baby booties go to this link:

https://www.etsy.com/listing/112299511/sale-baptism-beaded-baby-shoes-booties?ref=shop_home_active_3

Prices subject to change.

                                                   KellysGifts


                                 Beaded Crochet Baby Sandals Booties with Crochet Thread Part 2
For Part 1 go to link below:

In Oct. of 2012 I listed some tips on beading baby booties. With the tips you can bead anything.

                       Beaded Crochet Baby Booties with Crochet Thread
                 

     Crochet Tip with free sole pattern
 Here I'm going to share with you that the patterns that you see for the beaded baby booties can be found in crochet books at Wal mart and Jo anns. You just need to add the beads first before you start crocheting.

You can buy a book at Wal Mart for less then $5.00. By the way the books come with about 8 patterns or more I think with all types of booties including the one that looks like what you see pictured.

But I made my patterns up where you don't need to cut the thread you just keep working the bootie.
You can, also buy the bow flower already done from the store. I make my own, it takes time to do this.  

Here you can see some that I have made from the patterns that where made by me, just click the link above to see the pictures.

 Here is a link to see the tips on beading:

http://kellysgifts.blogspot.com/2012/10/beaded-crochet-baby-booties-with.html

BABY FOOT SIZE CHART
THIS IS ABOUT EACH BABY MAY EVERY A LITTLE
AGE OF BABY SOLE LENGTH

NEWBORN 7.8 cm / 3”
3 MONTHS 8.9 cm / 3.5”
6 MONTHS 10 cm / 4”
9 MONTHS 11 cm / 4.5”
12 MONTHS 13 cm / 5”

Links: More terms go to: http://www.lionbrand.com/cgi-bin/faq-search.cgi?dictionaryOfAbbreviations=1&store=/stores/

For tips: http://kellysgifts.blogspot.com/

DIRECTIONS: 

Thread on half of the beads before starting, about 75 for one bootie. (I thread enough for both.)

Working bead trimming
For tips: http://kellysgifts.blogspot.com/

May use one of the trims listed.
Used for the Pink booties as listed.
Top of shoe: ch3, hdc, bead in front of hook, slst, Repeat. Slst, to bottom of hdc. Finish off.

Bottom of shoe: With the sole facing away from you, slst to the heel of sole where stitches are raised. *Ch3, sc bead in front of hook, sc.* *Repeat.* slst in bottom of sc. Finish off.

https://www.etsy.com/listing/155283279/0-12-months-2-pattern-beaded-baby?ref=shop_home_feat_4

https://www.etsy.com/listing/197972373/crochet-patterns-14-a-beaded-slippers?ref=shop_home_active_1

Ribbon for Ties

Ribbon for ties: Cut 2 at 10”, with a wood burner or use sewing glue on ends. Weave in and out of the shoe where you made the triple chain 1 spaces.
Ribbon for bow: Cut 10 at 2”. Use 5 and fold in half, sew the 5 to make a flower bow. Sew beads in center as pictured. Sew to shoes.


Dec 28, 2016

TEAM HAT! Striped Christmas Hat Crochet Pattern


Copyright 2016. Not for sale or copying of any kind. Design by Kelly Taylor of KellysGifts


Striped Christmas Elf or TEAM hat you can make this in any color that you wish.
Just made this hat for my daughter. She need a hat for work because they told your that they needed to dress up for Christmas, she loved it!
This hat would be great for School or Team Hat for those games that you go to of your favorite team or just hanging out with friend's.


You can see full detailed pattern Here.


Materials Needed:
2 Skeins of worsted weight yarn
Crochet hook size I
Yarn markers
Cardboard

Starting with the brim of the hat. You will need to measure around your head to see would size brim you will need to make. One pictured is 20" around.
Use marker to mark your sl st sps, doesn't court of a stitch.

Brim

With White or any color you wish.
Ch 8, start in the second ch from hook work sc and sc in each ch across. ch1, turn.

Fpsc around each st across to end. ch 1, turn. repeat until you get the size needed. Sl st ends together to form a ring, this is you brim. Don't cut or finish. Ch 1, this is the start of the body of the hat. 

Copyright 2016. Not for sale or copying of any kind. Design by Kelly Taylor of KellysGifts

Body of hat

Work evenly across the brim with sc until you get the ch 1. Sl st in the ch sp. 

Row 1: Ch 1, Work a hdc in each sp around. Ch 1.
Row 2 & 3: Repeat row 1. 


Copyright 2016. Not for sale or copying of any kind. Design by Kelly Taylor of KellysGifts

Change color to Red or any color you wish. From here on you will be working 3 rows of each color.

Round 4 & 5: Repeat Round 1. 

Round 6: Decease round. hdc in first sp,*dec in next 2 sps. Hdc in next 4 sps. * Repeat. Sl st, Ch 1.  Note decrease is every 5th sp.

Change color
Round 7: Decrease every 4 sps. Sl st, ch 1.
Round 8: Decrease every 3 sps. Sl st, ch 1.
Round 9: Hdc in ea sp around. Sl st, ch 1.

Change color
Round 10-12: Repeat Round 9.

Change color
Round 13: Repeat Round 8.
Round 14: Decrease every 2 sps. Sl st, ch 1.
Round 15: Hdc in ea sp. S; st, ch 1.

Change color
Round 16-18: Repeat Round 15.

Change color
Round 19: Repeat Round 15.
Round 20: Decrease every 2 sps.
Round 21: Repeat Round 15.

Change color
Round 22-23 Repeat Round 15.
Round 24: Repeat Round 20.


Copyright 2016. Not for sale or copying of any kind. Design by Kelly Taylor of KellysGifts

Change color
Round 25-26: Repeat Round 15.
Round 27: Repeat Round 20.

Change color
Round 28-30: Repeat Round 15.

Change color
Round 31-33: repeat Round 15.

Change color
Round 34-36: Repeat Round 15.

Change color
Round 37-38: Repeat Round 15.
Round 39: Repeat Round 20.
Round 40-42: Repeat Round 15.


Copyright 2016. Not for sale or copying of any kind. Design by Kelly Taylor of KellysGifts


Change color
Round 43-45: Repeat 15.

Change color
Round 46-48: Repeat 15.

Change color
Round 49-51: Repeat 15.

Change color
Round 52-53: Repeat 15.
Leave long to tie off and to tie on pompom. 
Pompom use a 4" piece on cardboard to make the pompom. Tie the pompom to the end of hat. finish off.


Copyright 2016. Not for sale or copying of any kind. Design by Kelly Taylor of KellysGifts


Feb 24, 2016

Crochet Scrubbies/Facial Pattern

Crochet, Knit, Sewed items
and Patterns.

www.KellysGifts.etsy.com


Crochet Scrubbies / Facial Patterns

by Kelly L. Taylor


You will need:
Crochet cotton for dish cloths only color, crochet hook size F


 Ch = Chain
Dc = double crochet
Dec = decrease
Hdc = half double crochet
Sc = single crochet
Sp = space
Sl = slip stitch
St = stitch
Tr = treble 


Materials:


Cotton yarn- colors – Red & Cream. Size F crochet hook.
Working with cream color


Round 1- ch 4, sl st to first sh to make a ring. Ch 2, work 11 hdc in ring sl st at top of ch 2.

Round 2- Ch 2, in sand sp hdc, work 2 hdc in e asp, around, sl st to top of ch ch2. 

(Change here for the circle in center) * If you like to change color, here for circle look, you can keep going with same color.

Round 3 – Ch 2, in same sp work hdc, work hdc, work hdc in next sp, *2 hdc in next sp, hdc in next sp, * Repeat 6 time* total of 7, stop. *You are only going 3rd the way. Turn.

Round 4 – Ch 2, hdc in each space back to ch 2. Finish off only if changing color, if not go to Round 5.

*Trim with red.

Round 5 – If using same color ch1, sc in each sp around. Finish off. If using different color so st, ch1, sc in e asp around and finish off.


www.KellysGifts.etsy.com
Designed by Kelly L. Taylor  
Content Copyright, © 2012,  By Kelly L.Taylor.  All rights reserved.
This content was written by Kelly Taylor. If you wish to use this content other than for personal use of making garment for your use only, not for selling or copy in any manner, you need written permission.


Sep 12, 2013

New Crochet Baby Booties Beaded Baby Slippers by Kelly Taylor

 For the pattern go to link to download: https://www.etsy.com/listing/161774503/pattern-beaded-baby-slippers-crochet?ref=shop_home_active

Need a pair but can't crochet go to this link:
https://www.etsy.com/listing/162501267/beaded-baby-slippers-shoes-crochet?ref=shop_home_active


https://www.etsy.com/listing/197972373/crochet-patterns-14-a-beaded-slippers?ref=shop_home_active_1


https://www.etsy.com/listing/266141759/0-12-months-2-pattern-beaded-christening


Oct 23, 2012

Beaded Crochet Baby Sandals Booties with Crochet Thread Part 1


Crochet Tip with free Sole pattern
Baby Booties Crochet Beaded Baby Booties/sandals, Baby prop by Kelly Taylor


This is not a link for a pattern. This link is for a pair of Baby Beaded Sandals.

Here are some links
 for Baby booties


http://www.etsy.com/listing/110702805/custom-crocheted-beaded-baby-booties

Here is link for Pattern

https://www.etsy.com/listing/268478221/0-12-months-2-pattern-beaded-baby?ref=listing-shop-header-1
You can find Pattern here:

Tip for beading 
This is a pattern tip for Beaded Baby booties.
You can take any pattern and add beads to it. The easiest way is to add the beads on the yarn or thread first, by using a bead needle that has a very long hole in through it.


For any baby booties pattern you are going to start with the sole of the booties.
For crochet thread #10 you chain 20 to 22 chains using a #7 steel hook 1.65mm.
This will make a small 0-6 months, if you are a tit crocheter they will be 0-3 months. Use a hook that will make a bigger stitch for a larger booties or add more chains to start the booties.
**Note: you will have to keep pushing the beads down on the thread or yarn until you need them.
*Remember to add 3 chains that will count as your first stitch, dc in the 4th stitch from hook. Dc to the end and make 5 dc in the last stitch. Working on the other side of chain dc to other end. This will be where you started, in last stitch with the first chain make 4 dc. Slip stitch
*In the next round you will make a dc in each single dc and 2 dc in each dc at the ends where the 5 dc are from the last round. Slip stitch
*In the next round you are going to dc in each single dc and in the spaces that have 2 dc work in each one a pattern of *(2 dc in the first dc, 1 dc in the next)* repeat this in each space that has 2 dc from the last round do the same at the other end. *make this centered around the ends* Slip stitch
*In this round you will dc in each stitch. Slip stitch
*Work around the back of the post from last round. Slip stitch (this will be the first row of the upper shoe)
*Chain 3 dc in each stitch and sl st.
Sole made with first 2 rows of the upper shoe.
You can use this sole for any type of shoe you wish to make.
Bead Tip: To place a bead, slide a bead in front of the hook all the way to last stitch made. Make your next stitch. *(or you can push the bead up to the last stitch and make a chain, to hold the bead where you want it).
Custom, Crocheted Beaded Baby Booties Sandals for Baby Girl or Baby Boy custom orders, newborn photo prop
Tip:
For the bead on the bottom of the shoe you will do this after you end the top of shoe and finish off. Slip stitch to the back of the sole (heel away from you) where stitches are raised up start your stitches with beads around the sole. I do a chain 3, hdc, bead, sl st, repeat (one stitch in each space).
*I all so use a chain 3, sc, bead sc, chain 3.


For a full PDF download pattern you can get one here.

I do have my own patterns.

Two patterns plus one.


The photos are not in order. Should help you if you bought the book from walmart or pattern from another source.


https://www.etsy.com/listing/155283279/0-12-months-2-pattern-beaded-baby?ref=shop_home_feat_4


https://www.etsy.com/listing/155283279/0-12-months-2-pattern-beaded-baby?ref=shop_home_feat_4


Pattern link below:


For a PDF download use link below.

Jun 14, 2012

Feb 16, 2012

Angel Dishcloth Free pattern


This is just for those that are looking for the new project that you have been waiting for or that pattern that you have been looking for but couldn't find. While here it is seen on the
Carol Duvall Show years ago. This was sent in from a fan, the pattern can be found on hgtv.com here is the link: http://www.hgtv.com/crafting/shoebox-bottlecap-trivets-bracelets-and-more/index.html
P>S> Mine is a little different. I do my own thing. No pattern for my work, I just go to work doing my thing. Really you can make your dishcloth anyway you like and then make it into an Angel. Go for it who said you have to have a pattern.

Make any kind of square and then make your Angel in the center of your square. Have fun making your dishclothes.  Check out this site for the pattern: http://www.hgtv.com/crafting/shoebox-bottlecap-trivets-bracelets-and-more/index.html

Crochet Stitch Feather Crocodile Stitch Pattern

What a day, I went to make a hat with the crocodile crochet stitch and this is what happened. I was just crocheting away and didn't realized that I was putting the scales in the same place as the last row. Just made a new stitch pattern that I call Feather Crocodile Stitch.  


I would like to share this tip with you. If you go and check out the pattern on my page for the Crocodile Stitch pattern. Click link here:http://kellysgifts.blogspot.com/2012/02/tired-of-plan-old-thing-2.html
There you will see that you make 2 double crochet stitches in the same stitch in between the scales that where made in the last row. But in this pattern you made 2 double crochet stitches in the same space as the scales that was made in the last row.
You can get the pattern if you go to this link: http://www.etsy.com/listing/92974846/feather-crocodile-crochet-ear-warmer

Feb 10, 2012

Crocodile Stitch crochet Pattern


Will, I started to make this hat with the crocodile stitch and had to change it to a ear warmer. I lost my place in the pattern that I was writing and where I was at on the hat, LOL.
Tip: Don't started on new pattern when things are getting bizzy for you. Christmas time was a bizzy time for me. We where going to family dinners and trying to get our own family together too. That, was not the right time to design a new pattern. You can in the photo what I did get done.
I have start all over with a new color and pattern, now if I can just stick to it, LOL. Really it's a easy stitch to pick up. Here I will show you with some photos.

Pattern: Crocodile Ear Warmer Stitch
Pattern starts with a foundation. First, ch 78, sl st in first ch to form circle, ch 2 in same spaces, hdc in each ch st around, sl st in the top of ch 3.
Row 1: Ch 4,* skip 2 sts, 2 dc in 3rd st, ch 1, skip 2 sts,1 dc, st in 3rd st, ch 1* repeat around sl st in ch 3. 
* Working around the first dc post (of the first 2 dc in same space) work 5fpdc, ch 1, working on the next dc post work 5 fpdc around post, sl st in the top of next dc* (one scale made) Repeat**. Note the 2 dc that are in the same space are the posts you are going to be working around fpdc = front post double crochet.

Photo of foundation:

This is the a photo of the foundation. Next you will a photo of the front of the scale fpdc stitch and what it looks like from the back side.
Next photo views.                                                                                   Back view.
Front view, first crocodile scale.
Row 2: In the sl st space ch 4, dc in same st, ch 1. * dc in center of crocodile scale ch 1, 2 dc in between the two scales ch 1,* Repeat. ** sl st in 3rd ch of ch 4 to join row.

Now you are going to work around post of the two dc that are in the same st. 5 fpdc, ch 1,5 fpdc on dc post sl st in top of single dc, scale made. repeat around.
The front will look the the first photo and back side will look like this second photo.
Keep working this pattern to you have 4 rows of scales and then hdc in each st around for the last row. If you want a wider ear warmer then make more rows before you fo the hdc row.